My custom Claude Code setup

In my previous post about Claude Code , I described how it helped me migrate and revive this website after an eleven-year hiatus. That was the beginning. Since then, I have been using Claude Code daily for increasingly complex projects — from embedded firmware for rocket controllers to full-stack applications. Along the way, I have built up a setup that goes well beyond the defaults.
This post covers the infrastructure, configuration, and workflow I have settled on after months of daily use. It is written for someone who already knows what Claude Code is and wants to push it further.
Running Claude Code on a dedicated machine#
Claude Code runs in your terminal. That means it has access to whatever machine it runs on — files, network, installed tools. The obvious security concern is that an AI agent with file system access can do damage, especially when combined with the permissions settings I will discuss next.
My solution: run Claude Code on a dedicated VM. This gives me several advantages:
- Isolation — if something goes wrong, the blast radius is limited to that VM. My main desktop, personal files, and other projects are untouched.
- Reproducibility — the VM has a known set of installed tools and dependencies. I can recreate it from scratch if needed.
- Resource control — I can allocate specific amounts of CPU and RAM to the VM, keeping the rest of my system responsive.
The VM is accessed over SSH, which means I can connect to it from any machine on my network — my desktop, my laptop, even a tablet with a terminal app.
Keeping configuration in sync across machines#
I do not always work from the same machine. To keep my Claude Code configuration consistent everywhere, I store all configuration files on a NAS (Network Attached Storage) mounted at /mnt/claudecode-nas/. A setup script then creates symlinks from ~/.claude/ to the NAS:
settings.json→ global settings, hooks, and plugin configurationstatusline-command.sh→ the custom status bar scriptcommands/→ custom slash commandsskills/→ installed skillsprojects/→ per-project memory and CLAUDE.md files
When I sit down at a new machine, I run the setup script and everything is ready. The NAS acts as the single source of truth for my Claude Code environment.
The model selector: switching backends on the fly#
Claude Code is not tied to a single AI provider. Through environment variables, it can connect to Anthropic’s API, third-party Anthropic-compatible endpoints, or even local models via Ollama. I use all three, depending on the task.
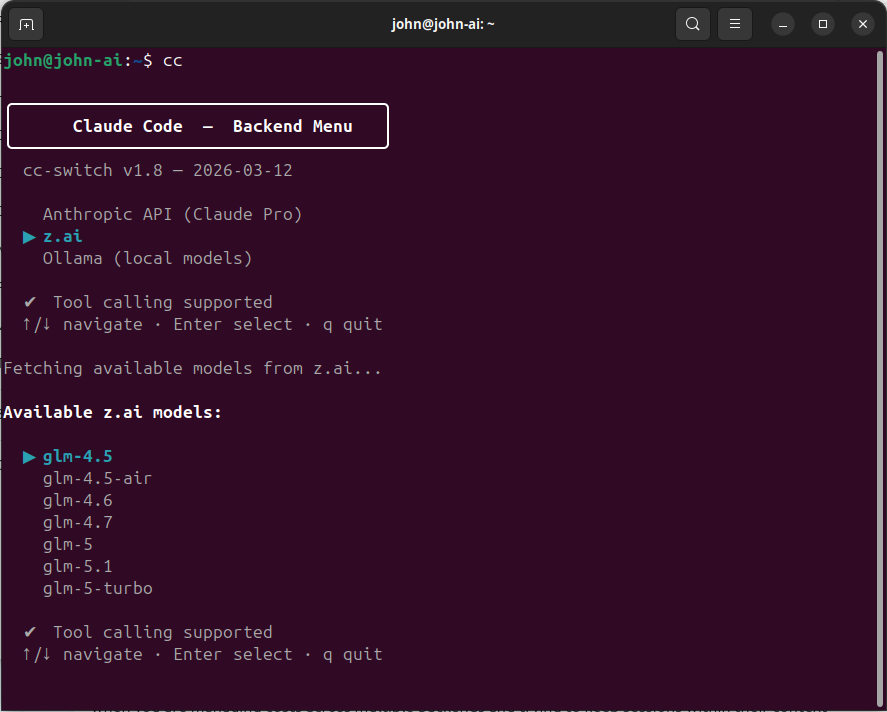
To make switching seamless, I wrote cc-switch — an interactive shell script that presents a menu of available backends, fetches the live model list from each provider, and lets me pick a model using arrow keys. Once selected, it configures the right environment variables and launches Claude Code. The source code is available on GitHub
.
The three backends I use#
z.ai is my primary backend. It is an Anthropic-compatible API provider that offers GLM models at low cost with high usage limits. I use GLM models for the bulk of my work — implementation, refactoring, content creation, and most coding tasks. The quality is good enough for the vast majority of what I do. The compatibility layer means Claude Code works with it without modification; it just sends requests to a different endpoint.
Anthropic (Claude Pro subscription) is my secondary backend. I primarily use Claude Opus for tasks that require deep reasoning: reviewing GLM’s output, validating complex architectural decisions, and working through particularly tricky problems. The Pro subscription has hourly and weekly usage limits that I hit regularly, so I reserve Anthropic’s models for the tasks where their reasoning power really matters.
Ollama (local models) is for offline work or when I want complete privacy. I have a workstation with an RTX 3090 (24 GB VRAM) that can run 32B parameter models locally, as I described in my post about building a local LLM workstation . The quality is lower than Claude, but for simpler tasks it works well, and the marginal cost is zero.
Latest model preselected by default#
When the model list appears, I almost always want the newest model — and I don’t want to arrow-key through seven options to reach it. The switcher now sorts models newest-first using version-aware sorting, so the latest release is always at the top of the list and highlighted by default. One press of Enter selects it.
For Anthropic specifically, the ordering is a bit more nuanced: models are grouped by tier (opus first, then sonnet, then haiku), and within each tier the canonical model name (e.g. claude-opus-4-7) appears before dated snapshots (e.g. claude-opus-4-20250514). Since I almost always want the latest opus model, the default selection is immediately ready.
Tiered model mapping#
One detail that matters: Claude Code internally uses three model tiers — opus for complex reasoning, sonnet for main tasks, and haiku for quick operations. When using z.ai, my switcher script automatically maps these tiers to appropriate GLM models. At the time of writing, the mapping looks like this:
- Opus → GLM-5.1 (the heaviest model, for complex reasoning)
- Sonnet → GLM-4.7 (mid-weight, for main tasks)
- Haiku → GLM-4.5-air (lightweight, for quick operations)
This keeps quick operations fast and cheap without sacrificing quality on the hard problems. Note that these specific model names will likely be outdated by the time you read this — the GLM model lineup evolves fast. The important principle is the tiered mapping itself, not the specific model names.
Handling flaky APIs#
Not every API call succeeds on the first try. The z.ai and Anthropic endpoints occasionally return transient errors — 5xx server errors, rate limits, brief DNS timeouts. Originally, the switcher used curl -sf which silently returned an empty string on any HTTP error, producing an unhelpful “Could not fetch model list” message with no indication of what went wrong.
The fix was a small _cc_fetch helper function that wraps all API calls with sensible defaults: connection timeout of 5 seconds, a total timeout of 15 seconds, and up to 3 retries with a 1-second delay between attempts. Server errors (5xx) are retried automatically; client errors like a bad API key (4xx) fail immediately since retrying won’t help. This eliminated the intermittent failures without adding noticeable delay.
Automatic session recording#
Every session launched through cc-switch is automatically recorded using asciinema
. Recordings are saved as .cast files — a text-based format that captures terminal output as a sequence of events with timestamps, rather than pixel-based video. This means recordings stay perfectly sharp at any resolution, produce tiny files, and can be sped up or slowed down without quality loss.
The integration is simple: instead of calling claude directly, the switcher script passes the command through asciinema rec --command, which wraps the session in a recording that starts and stops automatically with Claude Code. When the session ends — whether by exiting normally or pressing Ctrl+C — asciinema finalises the .cast file and prints its location.
Recordings are stored in ~/asciinema-recordings/ with timestamped filenames like claude-20260416-165345.cast. They can be played back at any speed:
asciinema play claude-20260416-165345.cast        # normal speed
asciinema play -s 4 claude-20260416-165345.cast   # 4x speed
For sharing, recordings can be uploaded to asciinema.org for browser-based playback with speed controls, or converted to GIF or MP4 using agg for embedding in presentations or documentation. I use this to create sped-up demo videos that show what a full Claude Code session looks like in practice.
Why I use –dangerously-skip-permissions#
Claude Code has a permissions system that asks for confirmation before executing potentially destructive operations — running shell commands, writing files, accessing network resources. By default, every such action requires a manual approve or deny.
For interactive, cautious use, this is fine. For the way I work — long autonomous sessions where Claude Code implements a multi-file feature across dozens of steps — the constant approval prompts destroy the workflow. I would be clicking “allow” every few seconds for an hour straight.
Instead, I use the --dangerously-skip-permissions flag, which disables all permission prompts. This is exactly as dangerous as it sounds. Claude Code can run any command, modify any file, and access any network resource without asking. That is why it runs on an isolated VM.
The combination of isolation and trust is what makes it work:
- The VM limits what can be damaged.
- Git version control means every change is reversible.
- My backup strategy (covered later) provides an additional safety net.
- The projects I work on with full permissions are ones where I have reviewed the functional specification and understand the scope.
I would not recommend this approach for a shared machine, a production server, or a project where you cannot afford to lose state. But for a dedicated development environment with proper backups, it transforms Claude Code from a cautious assistant into a productive collaborator.
The custom status bar#
One of Claude Code’s lesser-known features is the configurable status line — a bar at the bottom of the terminal that can display arbitrary information via a shell script. I have built a status bar that shows me everything I need at a glance:
- Current model name — so I always know which backend and model is active
- Context window usage — how much of the conversation context is consumed (once it fills up, older messages get compressed and quality degrades)
- GLM plan usage — when using the z.ai backend, I see my MCP call percentage and token usage percentage, so I know how much quota I have left
- Total tokens — when using Anthropic Pro, I see the raw token count for the current session
- Working directory — which project I am in
- User and hostname — which machine I am running on
The status line refreshes automatically. The GLM usage data updates in the background every five minutes, so the numbers stay current without blocking the interface. It is a small thing, but it makes a real difference when you are managing costs across multiple backends and trying to keep sessions within their context limits. The source code is available on GitHub .

Skills#
Claude Code supports a skill system — reusable prompt templates that can be triggered with slash commands. These extend what Claude Code can do without writing custom code.
The skills I use regularly:
/coder— reads the project spec, progress, and test docs to plan and execute the next development phase. This is my primary implementation driver./codereviewer— performs an LLM-powered code review against the project spec and changelog. I run this between development phases to catch issues before moving on./codetester— runs automated tests where possible, then walks me through interactive manual tests for things that need human verification./changelog— writes a summary of the current session’s work to a changelog file. Keeps a running record of what was done, what decisions were made, and what issues were found./github— creates repositories, commits changes, and pushes to GitHub. Handles authentication via theghCLI with SSH keys./finished— end-of-session workflow that updates documentation, writes a changelog, syncs skills to GitHub, then commits and pushes any remaining project changes. I run this at the end of every session./projectcontext— initialises a new session with context about the current project by reading relevant changelogs and project files. Useful when starting a fresh session on an ongoing project./deploy-website— deploys my Hugo-based website to production via FTP.
Skills are stored in the ~/.claude/skills/ directory, which in my setup is synced to the NAS. New skills I install or create on one machine appear on all others. My custom skills are available on GitHub
.
My development methodology#
After months of experimentation, I have settled on a structured approach that consistently produces good results with AI-assisted development.
Step 1: Write a detailed Functional Specification Document#
Before any code is written, I write a Functional Specification Document (FSD). This is a comprehensive description of what the software should do, covering:
- System architecture and component breakdown
- Hardware interfaces and pin mappings (for embedded projects)
- Communication protocols
- State machines and control flow
- Error handling and recovery behaviour
- Safety requirements
- Test criteria
The FSD is written in plain language, not code. It is meant to be read by a developer who knows nothing about the project. The more precise and unambiguous the FSD, the better the result.
I typically write the FSD with Claude Code’s help — describing the requirements conversationally, having it organise them into a structured document, then reviewing and refining. The FSD typically ends up being 20–40 pages for a non-trivial project.
Step 2: Have a different model review the FSD#
This is a step many people skip, and I think it is the most valuable one. After the FSD is written, I start a new Claude Code session with a different model — for example, if I wrote the FSD using z.ai’s GLM-5.1, I review it with Claude Opus.
Why a different model? Because the reviewing model has no investment in the document. It will spot gaps, contradictions, and ambiguities that the model that helped write it will gloss over. It is the AI equivalent of code review by a colleague who was not involved in the original design.
The review produces a list of issues and suggestions. I incorporate the valid ones into the FSD, then sometimes do a second review round with yet another model.
Step 3: Phased development#
With the FSD finalised, development happens in clearly defined phases:
- Phase 0: Hardware validation — verify that all hardware interfaces work as expected before writing any application logic
- Phase 1: Foundation and communication — set up the basic framework, peripherals, and communication channels
- Phase 2: Core features — implement the primary functionality
- Phase 3: State machines and edge cases — add the complex control logic and error handling
- Phase 4: Integration and polish — final testing, documentation, and cleanup
Each phase has a clear scope and deliverables. Claude Code implements the phase, I review the result, and only when the phase is complete and tested do we move to the next one.
Step 4: Review and test between phases#
Between each phase, I have a different model review the code that was written. Again, the principle is fresh eyes. The reviewing model checks for:
- Adherence to the FSD
- Code quality and consistency
- Missed edge cases
- Potential bugs
Testing is tracked in a test specification document that is maintained alongside the code. Each phase adds new test cases. I do not move to the next phase until all tests pass and the review is clean.
Documenting progress#
I keep a development log — a changelog file that records what was done in each session, what decisions were made, and what issues were found. Claude Code’s /changelog skill automates much of this. Combined with the CLAUDE.md project instructions file (which Claude Code maintains itself as institutional memory), the project history is well-documented without manual effort.
This documentation is not just for show. When a new session starts, Claude Code reads CLAUDE.md and immediately understands the project context. When I need to understand why a decision was made three weeks ago, the changelog has the answer. This is what makes long-running projects with AI assistance actually work — you need the memory to persist across sessions.
The memory system#
Speaking of persistence: Claude Code has a built-in memory system that goes beyond CLAUDE.md. In the .claude/projects/ directory, it stores memory files that capture context across sessions — user preferences, project-specific knowledge, feedback about what works and what does not.
There are four types of memory:
- User — who I am, my role, my preferences for how to collaborate
- Feedback — corrections I have made (“don’t do X”) and validated approaches (“yes, this worked”)
- Project — ongoing work, deadlines, and architectural decisions
- Reference — pointers to external resources like dashboards, issue trackers, or documentation
This means that over time, Claude Code builds up an understanding of how I work. It knows that I prefer terse responses without trailing summaries. It knows which projects are active and which are on hold. It knows where the monitoring dashboards are. Each session starts with this accumulated context, which makes the collaboration progressively more efficient.
Hooks and automation#
Claude Code supports hooks — shell commands that run automatically in response to events. I use one hook: a system bell sound that plays when Claude Code stops working. Since I often kick off a long task and switch to something else, the audio notification tells me when to switch back.
Hooks can also be used for:
- Auto-formatting code after file writes
- Running linting checks before commits
- Sending notifications to external systems
- Logging activity to a file
They are configured in settings.json and are part of the NAS-synced configuration, so they work the same on every machine.
Managing costs across backends#
AI usage adds up. A single complex coding session can consume hundreds of thousands of tokens. Here is how I manage the cost:
z.ai (GLM models) is my primary backend. It is cheap, has high usage limits, and the quality is reasonably good for most tasks. I do the bulk of my implementation work — coding, refactoring, content creation — using GLM models via z.ai. My status bar shows me the usage percentage in real time, so I always know where I stand on quota.
Anthropic (Claude Opus) is my secondary backend. I switch to it when I need deep reasoning power: reviewing GLM’s output, validating complex designs, and working through architecture decisions. The Pro subscription has hourly and weekly limits that I hit often, so I am deliberate about when I invoke Opus. The strategy is simple: let GLM do the heavy lifting, then use Opus to check the work.
Ollama (local) costs nothing per query. I use it for quick experiments, syntax questions, and anything where I do not need top-tier reasoning quality. The trade-off is quality — a local 32B model is noticeably weaker than Claude Opus on complex tasks.
The multi-backend approach means I am never locked in. If one provider raises prices or degrades quality, I shift more work to another. The cc-switch script makes this seamless — the same Claude Code interface, different brain behind it.
When things go wrong#
No tool is perfect. Here is what has gone wrong and how I handle it.
Claude Code makes a mess of the code#
This happens. Usually when the task is ambiguous, the FSD is unclear, or the context window is getting full and older instructions are being compressed. The fix is straightforward: git checkout the affected files and try again with a clearer instruction. Because I commit frequently and work in phases, the worst case is losing one phase of work.
The session goes off the rails#
Sometimes Claude Code gets stuck in a loop, or starts pursuing an approach that is clearly wrong. The solution is to end the session, review what happened in the changelog, and start a fresh session with a more specific instruction. The memory system and CLAUDE.md ensure the new session has the right context.
Configuration or project state is corrupted#
This is where backups matter. My setup includes automatic backups of the .claude.json project state file. Combined with git version control for all project files and the NAS-synced configuration, I can reconstruct my entire environment from scratch on a new VM in about ten minutes.
My broader backup strategy uses Borg Backup with the 3-2-1 rule: three copies of the data, on two different media, with one off-site. The VM’s disks are backed up to both a local USB drive and the NAS.
Closing thoughts#
The setup I have described here took months to evolve. I did not start with the NAS sync, the model switcher, and the phased development methodology. I started with the defaults and added each piece when I felt the friction of not having it.
The key insight is that Claude Code is not just a chatbot in a terminal. It is a development environment that you can configure, extend, and integrate into your workflow. The more structure you give it — through FSDs, phased development, review cycles, and persistent memory — the better the results.
If you are just getting started, my advice is:
- Start simple. Use the defaults until you feel the friction.
- Isolate. Run it on a dedicated machine or VM with
--dangerously-skip-permissionsonly when you trust the environment. - Document. Write FSDs before coding. The time spent on the spec pays for itself many times over in implementation quality.
- Review with fresh eyes. Use a different model to review both specifications and code.
- Back up. Git is your safety net for code. Borg is your safety net for everything else.
The tooling around AI-assisted development is still early. What I have built works well for me today, but I expect it to evolve significantly as Claude Code and its competitors improve. The principles — isolation, structured methodology, multi-model review, and good backups — will remain relevant regardless of which specific tools are in use.